I bought my K2 Plus through Creality's crowdfunding campaign, received it among the first units shipped, and the counter now reads roughly 900 hours of printing. It has printed PLA, PETG, ASA and polycarbonate; functional parts, prototypes, figurines and cosplay pieces that make full use of its 350 mm build volume. This review is about what it's actually like to live with this machine over the long haul.
Machine bought with my own money (Creality crowdfunding campaign, delivered among the first backers). No press unit, no partnership, no sponsored links. For the full spec sheet and comparison with the other K2 models, see our K2 range guide — here we only talk about real-world use.
Why the K2 Plus
What sold me at the time: the 350 × 350 × 350 mm build volume, the heated chamber, the 350 °C nozzle and the CFS for multicolor — all at an aggressive crowdfunding price. Backing a campaign means accepting a gamble: young firmware, an ecosystem that isn't mature yet, zero user feedback to lean on. The first months did bring their share of corrective updates, but the firmware has stabilized considerably since.
I won't repeat the spec sheet here — the complete range guide covers it. The essentials for what follows: enclosed CoreXY, heated chamber up to 60 °C, 120 °C bed, and the four-spool CFS for color.
900 hours in: day to day
The best compliment I can pay this machine fits in one sentence: I start prints without checking. Without checking that the first layer sticks, without hovering over the first five minutes, without keeping an eye on it remotely "just in case". I send the file from the slicer, the machine calibrates, prints, and I come back to pick up the part. That's a luxury only people who have lived with temperamental machines can fully appreciate.
That confidence doesn't come from nowhere: automatic leveling and flow calibration on every job do the work, and the nozzle camera catches anything that might go sideways. Over 900 hours, single-color print failures can be counted on one hand — and when things did fail, it was usually my fault (bad orientation, forgotten supports) or multi-material's fault, more on that below.
The result: the K2 Plus has become my main printer, the one that runs by default. Everyday functional parts, prototype iterations, figurines to give away, large cosplay pieces printed in a few sections — everything goes through it.
The CFS's automatic spool relay. On a large part that eats more than one spool, the system switches to the next spool of the same material on its own. For cosplay and 20-hour-plus prints, it's the feature I use the most — far more than multicolor itself.
Materials tested
In 900 hours I've run everything my use cases call for through this machine. The verdict per material:
| Material | Verdict after real use |
|---|---|
| PLA | Uneventful. The everyday material, fast and clean, including multicolor through the CFS. |
| PETG | Very reliable once the filament is dry (the CFS helps keep it that way). My default for functional parts. |
| ASA | The heated chamber does its job: no notable warping on my outdoor parts. Mind the room ventilation. |
| PC | Yes, real polycarbonate. Hot nozzle + 120 °C bed + chamber: it works, with serious filament drying beforehand. |
| TPU / flexibles | The weak spot. Even fed directly (the CFS refuses them), results are inconsistent. Not the machine for this. |
The real surprise for me was polycarbonate: printing usable PC for mechanical parts on a consumer machine, without hacks, was far from a given. The thermal envelope (350 °C nozzle, heated chamber) makes a real difference compared to open-frame machines.
Conversely, let's be clear about TPU: if flexibles are a significant share of your printing, the K2 Plus is not the right tool. The CFS path refuses them (documented, and logical — soft filament in a long Bowden run jams), and even loaded through the front, I never got the consistency I get with rigid materials.
What I like
- Print quality. Consistent, clean, without constant tuning. The automatic calibrations on every job deserve much of the credit.
- The 350 mm build volume. You stop thinking about it until the day you print a cosplay helmet in two sections instead of six. A large volume changes how you design parts.
- Speed. A modern CoreXY: everyday parts come out in hours, not days, without sacrificing finish.
- The CFS. As much for the permanent dry-box and automatic spool relay as for multicolor itself.
- Creality Print. The in-house software is simple, effective and well integrated into the Creality ecosystem.
- Reliability. The core of this review: 900 hours, very few failures, no serious hardware breakdown to date.
- Reasonable noise. For a machine this big and this fast, it stays tolerable — it runs in my living space without driving me out of the room. (One gripe about the power supply fan at idle, see the upgrades I'm considering.)
What falls short
- TPU, as covered. See above: not the machine for flexibles. Full stop.
- Multicolor ≠ multi-material. The nuance marketing never makes. Printing four colors of the same material works. Mixing different materials in one print (PLA + PETG for break-away supports, for instance) is another story: purge waste explodes, and the temperature differences cause frequent clogs. After several attempts I gave up on multi-material — single-material multicolor, on the other hand, works. Our multicolor guide explains why this limitation is structural on single-nozzle systems.
- Big and heavy. Budget the footprint of a small office fridge and about 33 kg. Personally it never bothered me — it has its dedicated spot on a solid cabinet — but measure your space before buying, and plan on two people for unboxing.
Don't count on a CFS (or an AMS, for that matter) for demanding material combinations. That's the territory of multi-toolhead machines — see our multi-tool printer roundup.
Upgrades I installed
After a few hundred hours, you know exactly what your machine is missing. Here are the four modifications I actually installed, in the order I would do them again.
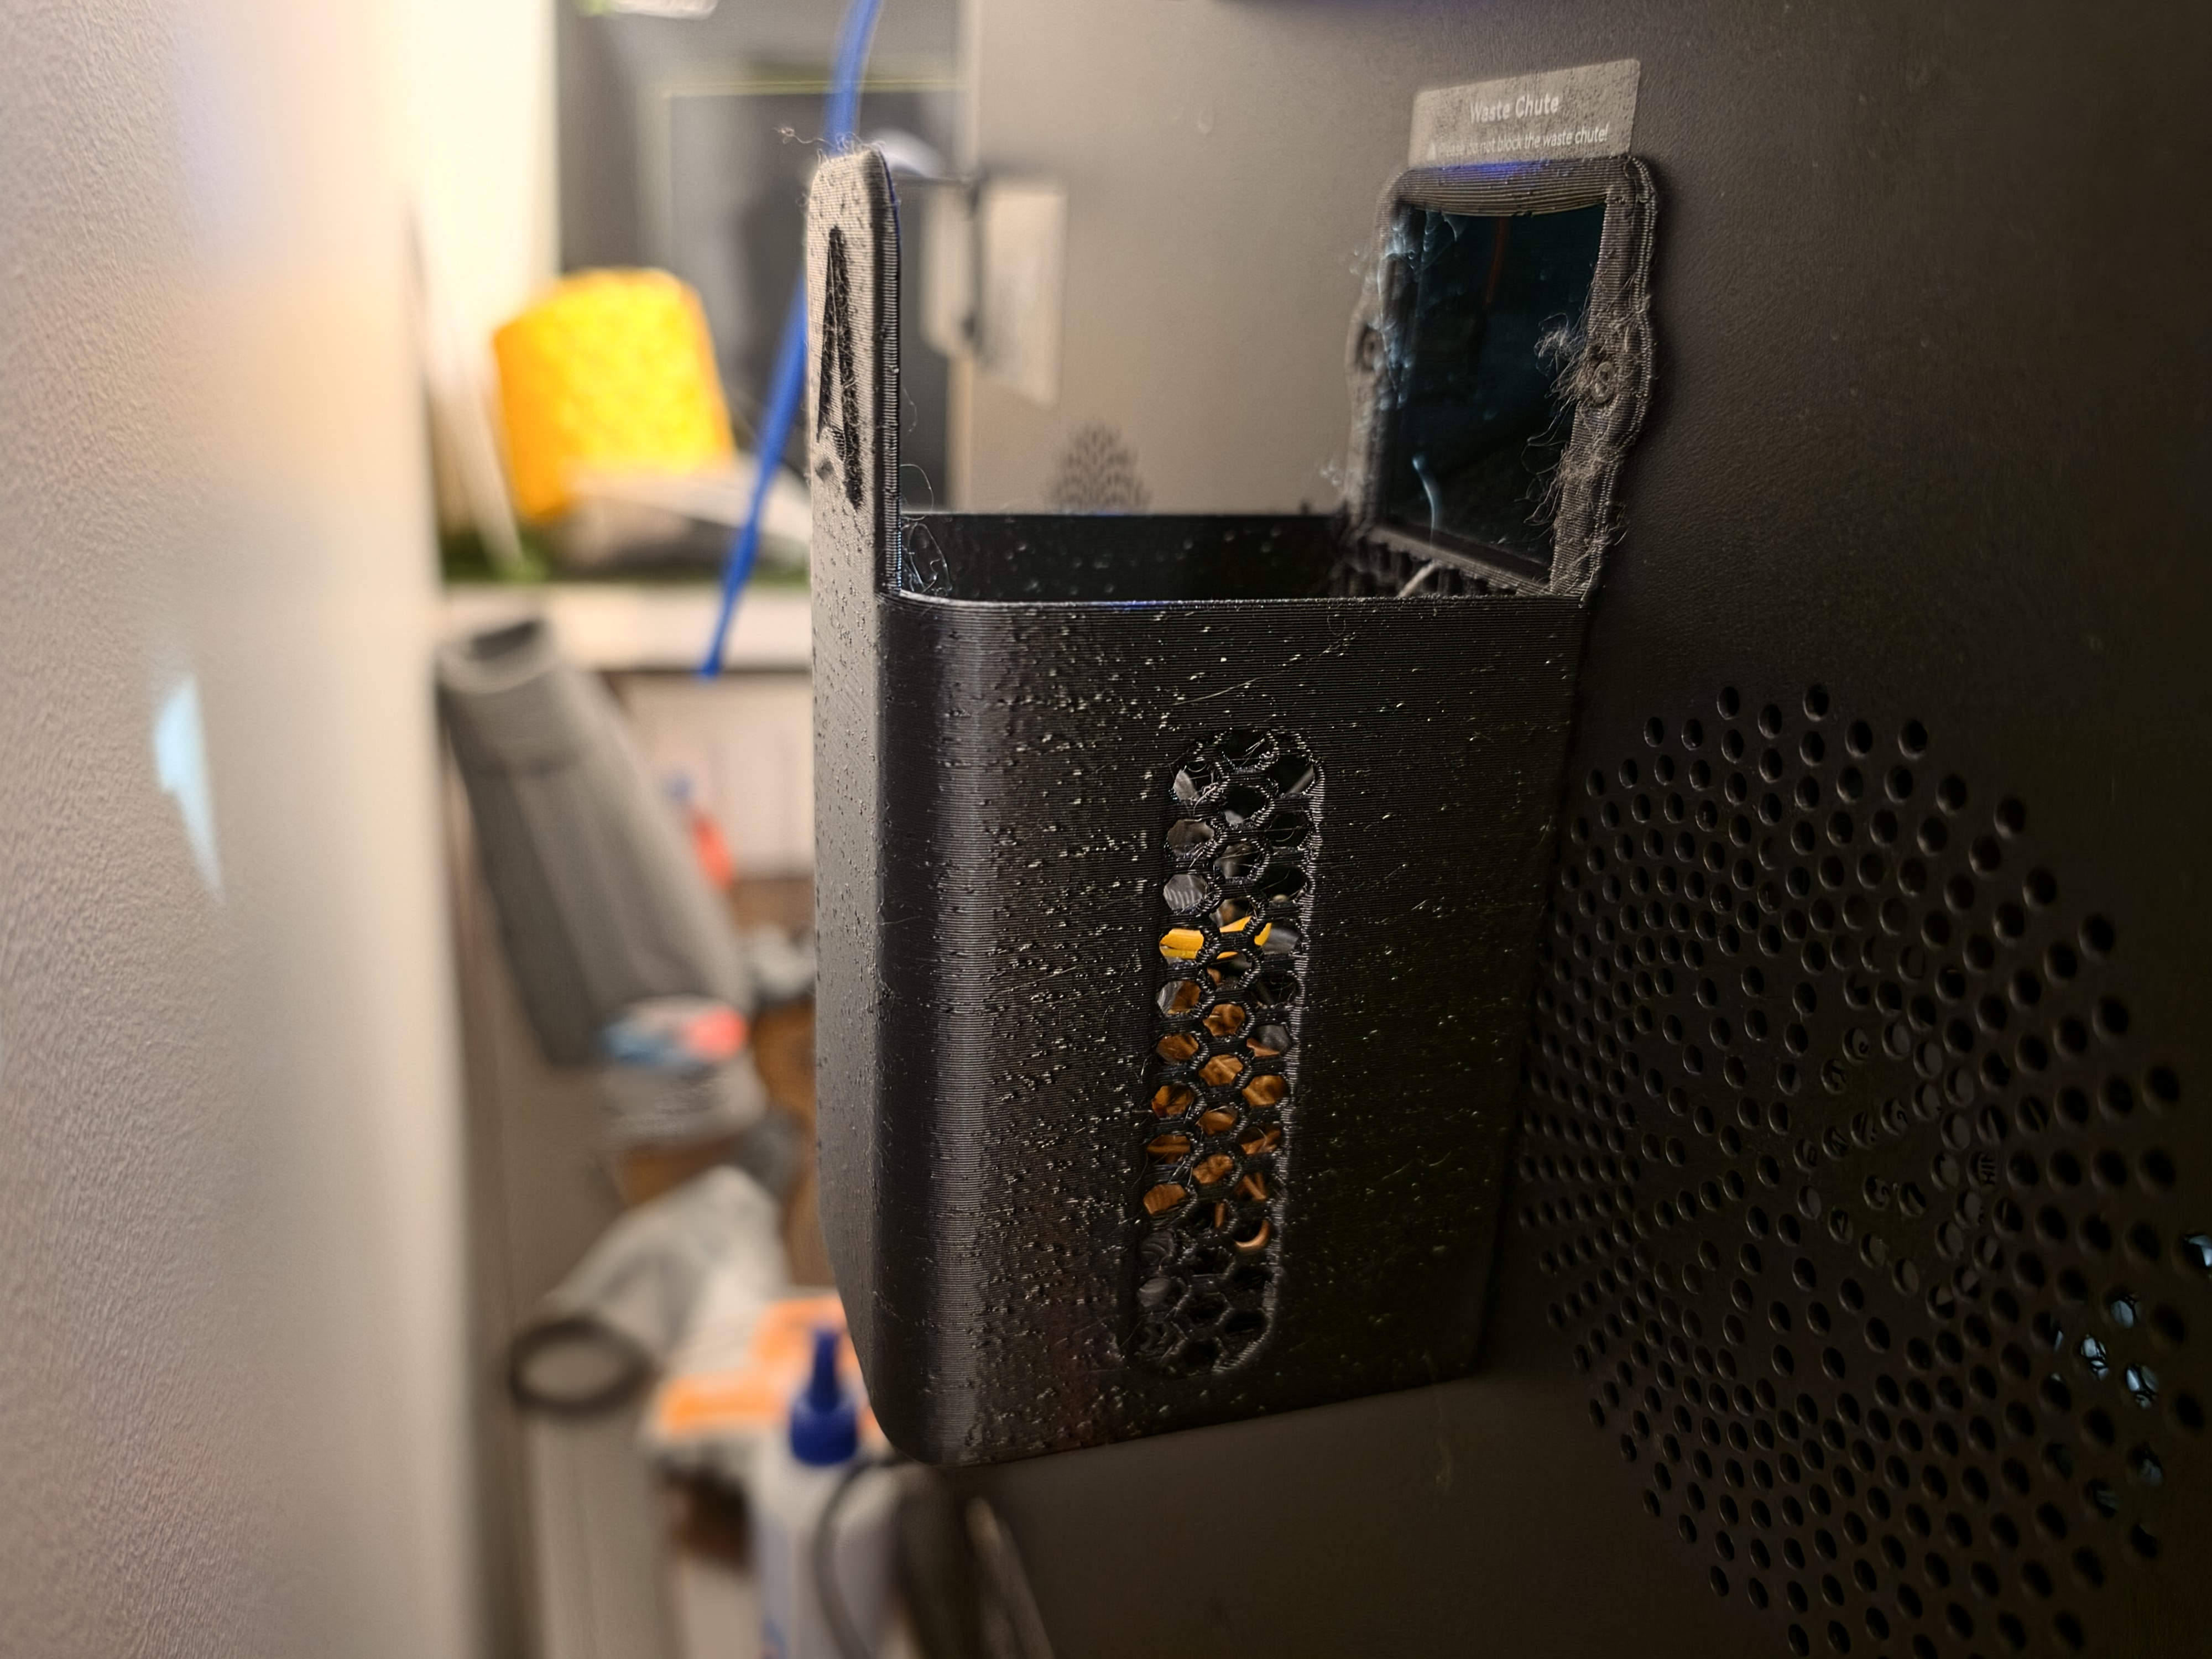
1. The purge waste bin ("poop chute")
Every color change ejects a small slug of purged filament out the back of the machine. With nothing there, it ends up in a pile on the floor. A printed reservoir attached to the chute collects everything neatly — just empty it now and then. It's the dumbest and most immediately useful upgrade on this list, and the machine prints it itself.
2. HEPA filters
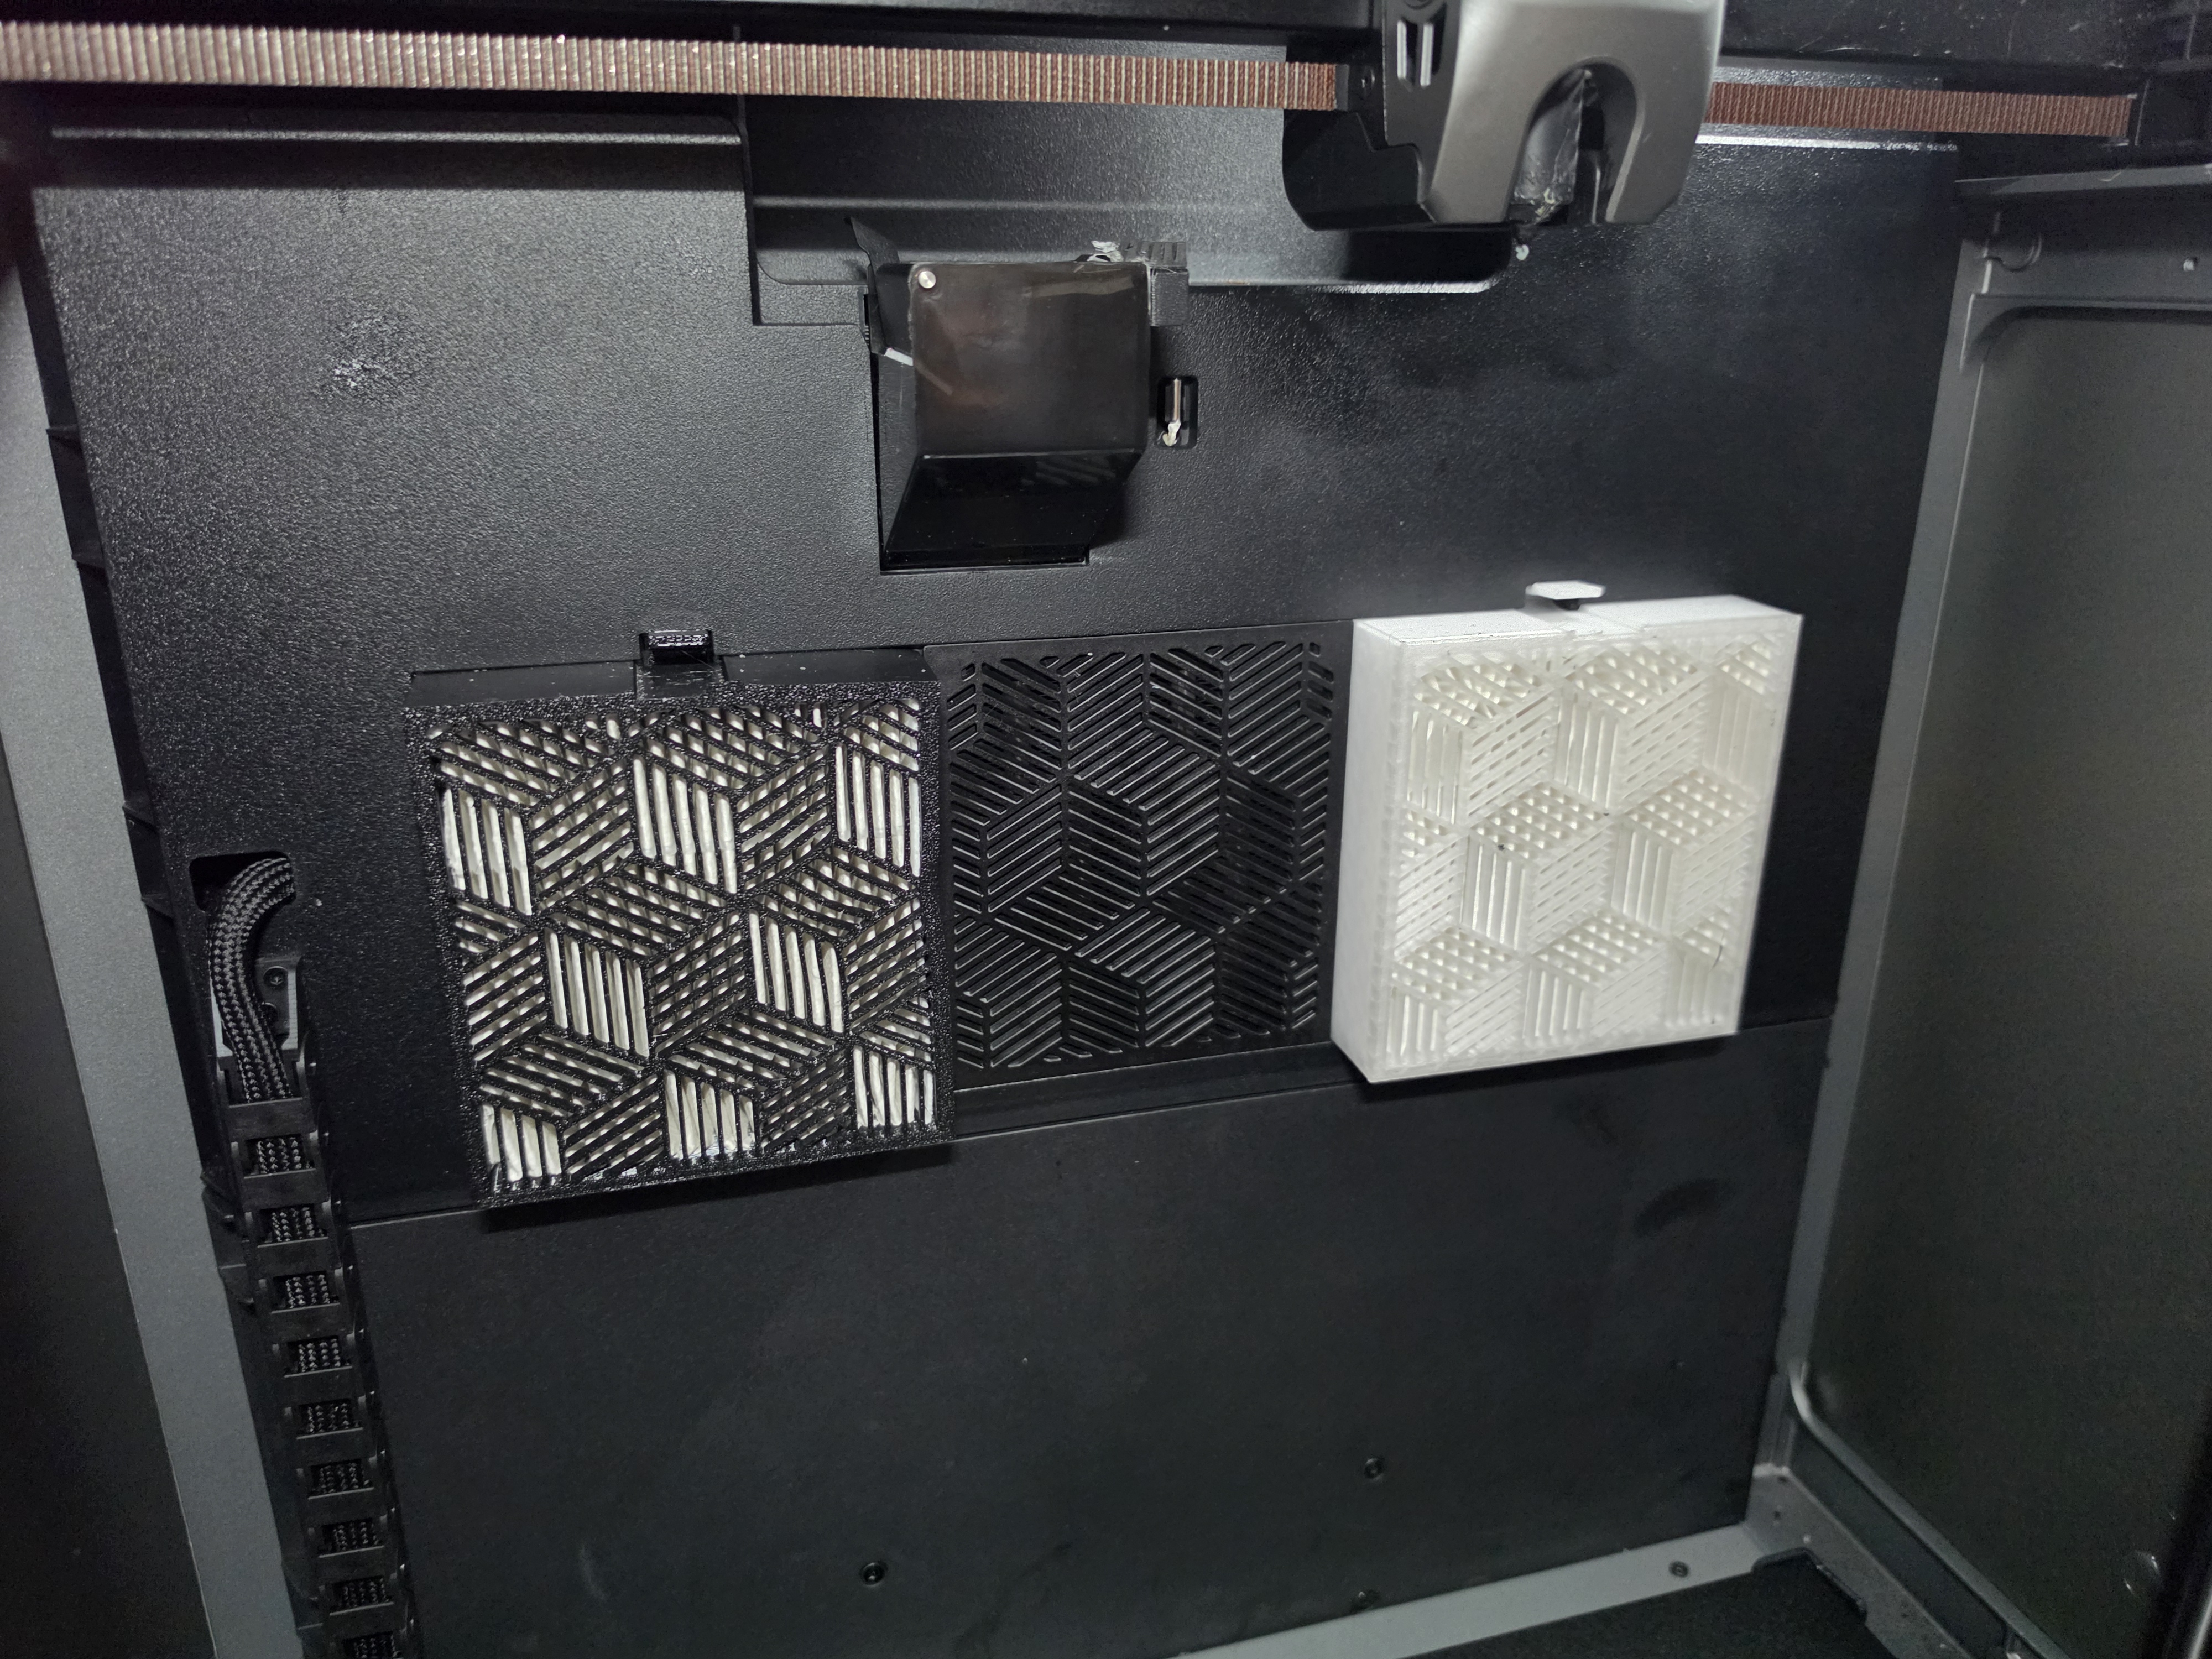
As soon as you print ASA or PC in an enclosed chamber, the question of fumes (VOCs and fine particles) comes up. So I modeled and added HEPA filtration on top of the stock filter. It's not a gimmick: the machine runs in my living space, and the ASA smell has dropped noticeably. If your printer lives in a ventilated garage, it matters less; in an office, I consider it essential.
3. The Cryogrip build plate
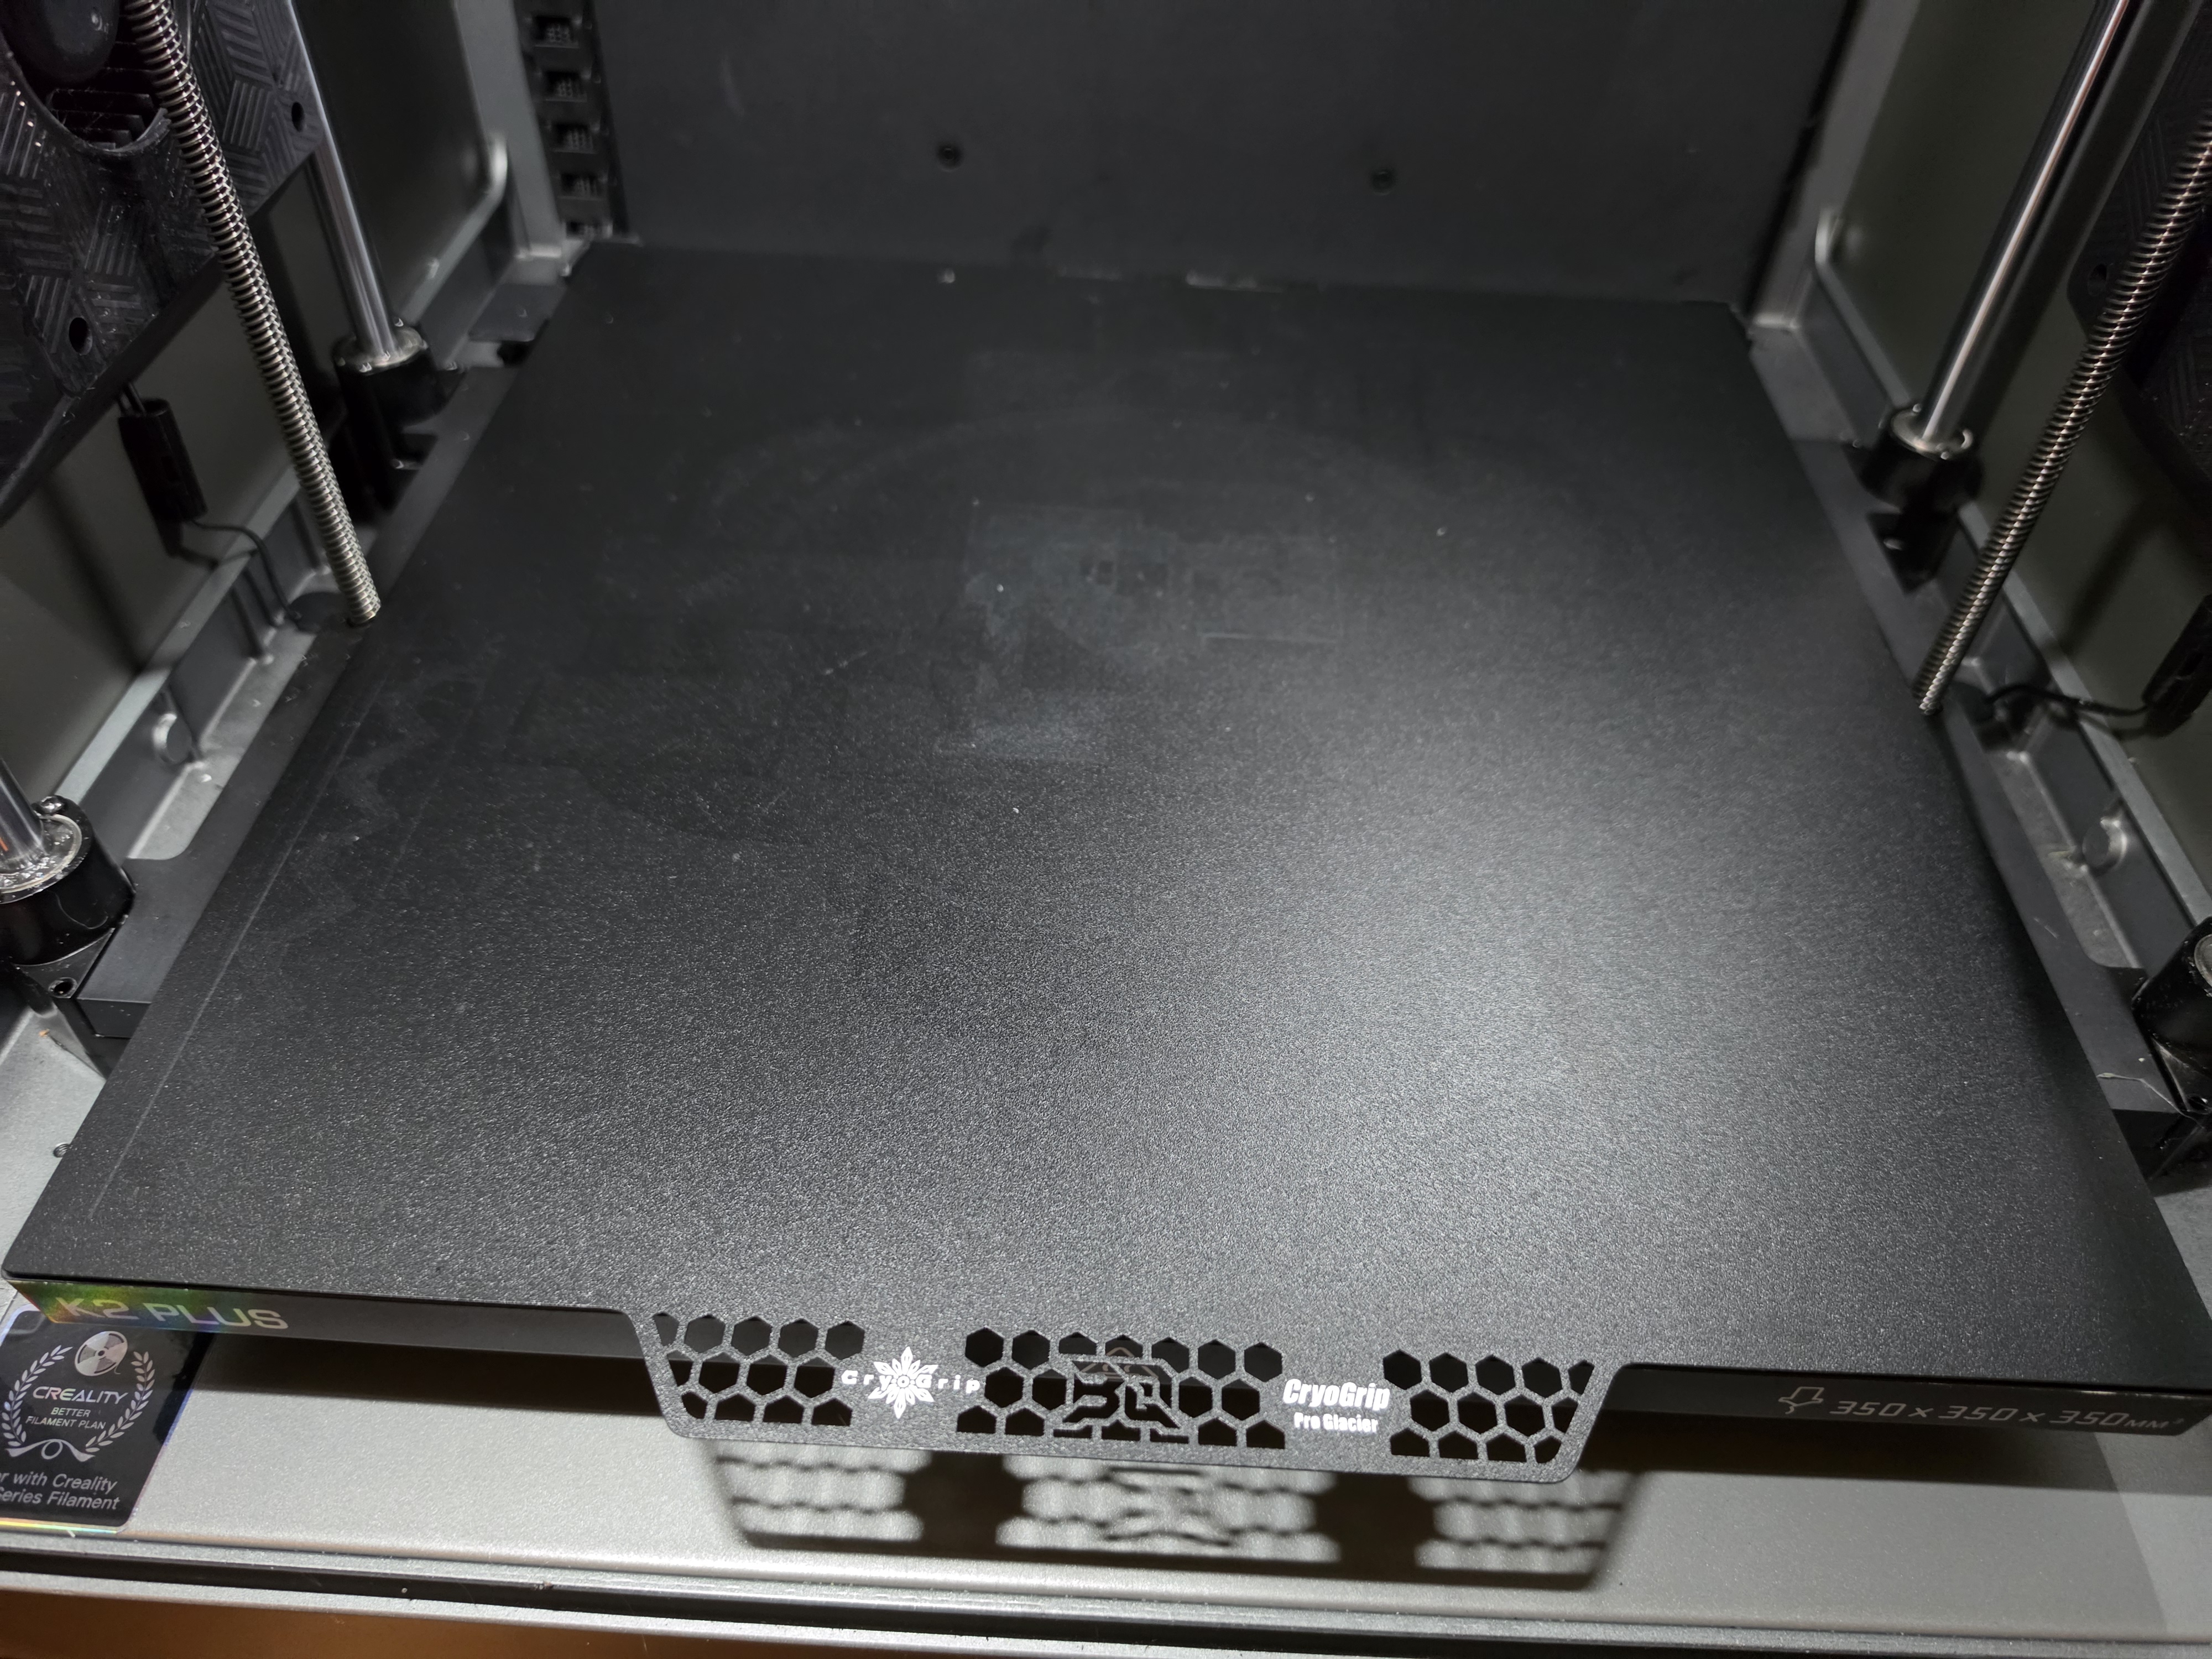
The stock plate does the job, but the Cryogrip from BIQU settled the adhesion question for good: parts hold without glue or hairspray, including large surfaces prone to corner lifting, and release on their own once the plate cools down. Since installing it, the question "will this stick?" has simply disappeared from my workflow — it's one of the reasons I start prints without watching them.
4. A 0.6 silicon carbide nozzle
I replaced the stock 0.4 nozzle with a Phaetus 0.6 in silicon carbide, far more abrasion-resistant. Two benefits in one: I can print filled filaments (carbon, glow…) without hollowing out the nozzle, and moving to 0.6 speeds up large parts noticeably, for a loss of detail I don't notice in my use. On a machine whose whole point is large volume, 0.6 is in my opinion the better default diameter — our nozzle size guide covers that trade-off in detail.

Upgrades I'm considering
Three modifications are on my list, identified over hours of use:
- Graphite bed (r3men). A graphite bed for a perfectly flat surface — automatic leveling compensates for the stock plate's imperfections, but a genuinely flat base is still better for large full-bed parts.
- Microswiss nozzle system. Quick-swap nozzles, no disassembly: handy for switching between the everyday 0.6 and a 0.4 for fine parts in seconds.
- Power supply upgrade. My only real acoustic complaint: the PSU fan keeps spinning even when the machine is idle and not printing. Some higher-quality power supplies shut their fan off completely at idle — that's the swap I'll make for a machine that's fully silent at rest.
For a broader look at which upgrades are worth the money (across all machines), see our upgrades guide.
Verdict after 900 hours
The K2 Plus did exactly what I expected of it, and a bit more: it became the default machine, the one you stop noticing because it just works. Big, fast, reliable, comfortable from PLA to polycarbonate, with a CFS whose real day-to-day value is dry storage and spool relay.
It's not for everyone: if you print a lot of TPU, look elsewhere; if you dream of multi-material (not just multicolor), single-nozzle will disappoint you; and if your desk space is tight, measure twice. But for a maker who wants a versatile, large-volume, walk-away main printer — 900 hours in, I'd buy it again.
900 hours later, the K2 Plus is the machine I no longer watch — and that's the finest compliment you can pay a 3D printer.