Multi-color and multi-material 3D printing has gone from niche experiment to mainstream reality. In 2025-2026, systems like the Bambu Lab AMS and Prusa MMU3 have made it possible to print in up to 16 colors with remarkable reliability. But you don't need expensive hardware to get started — a simple filament swap at a layer change can produce stunning results for free.
This guide covers every approach to multi-color printing: dedicated hardware systems, slicer-based techniques, manual methods, and the practical tips you need to get clean, vibrant multi-color prints on the first try.
Whether you want a two-tone nameplate or a 16-color masterpiece, there is a method here that fits your budget and printer.
Bambu Lab AMS (Automatic Material System)
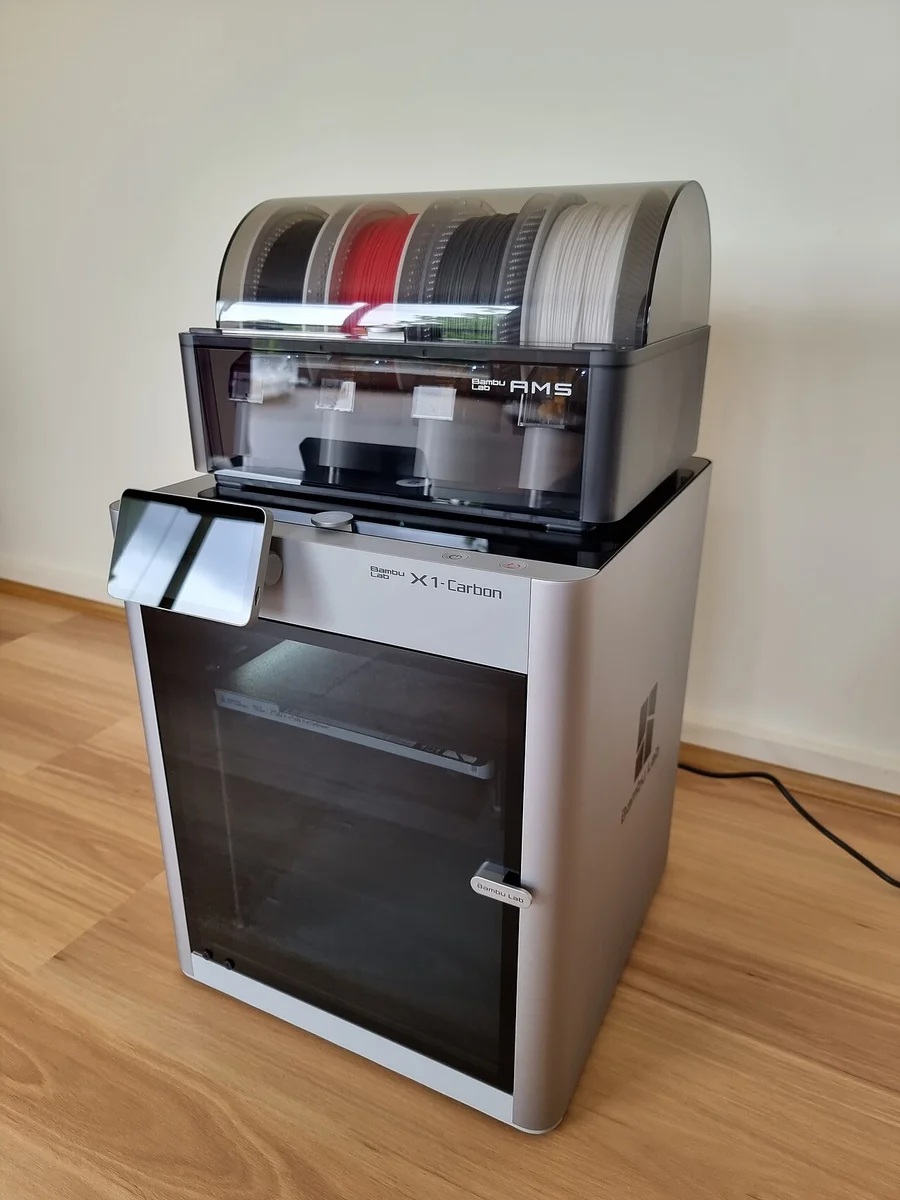
The Bambu Lab AMS is currently the most popular multi-color solution in consumer 3D printing. Each AMS unit holds 4 spools and up to 4 units can be daisy-chained via the AMS Hub, giving you access to 16 colors in a single print.
The AMS is compatible with the P1S, P1P, X1C, X1E, A1, and A1 Mini series printers. The A1 series uses the lighter AMS Lite variant, which is more compact but follows the same principle.
Since 2025, Bambu has expanded the lineup: the AMS 2 Pro adds active heating to dry filament while you print, the single-spool AMS HT handles high-temperature and more demanding materials, and the flagship H2D ships with its own multi-material support.
Key Strengths
- Reliability: Bambu's filament cutting and buffering system produces very consistent color changes with low failure rates.
- Speed: Color changes typically take 15-25 seconds, among the fastest in consumer systems.
- Integration: BambuStudio and OrcaSlicer have first-class support for the AMS, making setup straightforward.
- Humidity control: The sealed AMS units include desiccant trays, keeping filament dry during long prints.
Limitations
- Works only with Bambu Lab printers — no third-party compatibility.
- Struggles with flexible filaments (TPU) due to the Bowden-style filament path.
- Each color change generates purge waste (see purge tower section).
Prusa MMU3 (Multi-Material Upgrade 3)
The Prusa MMU3 supports 5 filament inputs and mounts directly onto Prusa MK3.5/MK4/MK4S and CORE One printers. It represents a major reliability improvement over the notoriously finicky MMU2S, with a completely redesigned filament feeding mechanism.
Key Strengths
- Improved reliability: Nextruder-based loading with a cutter mechanism drastically reduces jams compared to MMU2.
- PrusaSlicer integration: Seamless setup with color painting, purge settings, and wipe tower configuration built in.
- Open ecosystem: Works with any 1.75 mm filament, and PrusaSlicer is free and open-source.
- 5 materials: One more input than the AMS single unit, and the fifth slot is useful for soluble support material.
Limitations
- Only 5 colors maximum — cannot be expanded like AMS Hub chaining.
- Color changes are slower than the AMS (30-60 seconds typically).
- Prusa MK-series printers only — not compatible with other brands.
- Higher price point (~300 EUR) compared to a single AMS (~100-150 EUR).
How Multi-Material Systems Work
Whether you use an AMS, MMU, or another system, the core process is the same:
- Filament retraction: The active filament is pulled back out of the hotend and extruder, typically into a buffer or back into the spool holder.
- Tip shaping: Before the filament exits the hotend, the system performs a sequence of short push-pull moves to shape the tip into a clean point. A poorly shaped tip causes jams during the next load. The Bambu AMS uses a built-in cutter for a clean cut instead.
- New filament loading: The next color is fed from the spool, through the PTFE tube, into the extruder and down to the hotend.
- Purging: The old color still in the melt zone must be flushed out. The printer extrudes material onto a purge/wipe tower until the new color runs clean.
- Resume printing: The printer returns to the model and continues with the new color.
The entire cycle adds 15-60 seconds per color change depending on the system. On a print with hundreds of color changes, this time adds up significantly.
The Purge Tower Problem
The purge tower (also called wipe tower) is the biggest downside of multi-color printing. Every time the printer switches colors, it must extrude enough material to fully flush the old color from the nozzle. This waste is printed as a small tower beside your model.
How Much Waste?
| Scenario | Approximate Waste |
|---|---|
| 2-color print, simple design | 10-30 g |
| 4-color print, moderate changes | 40-80 g |
| 8+ color print, many transitions | 100-200+ g |
The amount of purging needed depends on the color transition. Going from white to black requires much less purging than black to white, because dark pigment is harder to flush. Slicers let you set a purge matrix — different purge amounts for every color-to-color transition.
Tip: organize your color assignments so that dark-to-light transitions are minimized. The slicer's purge matrix lets you fine-tune volumes for each pair.
Reducing Waste: Purge-into-Infill & Support
Purge into Infill
Instead of wasting material on a separate tower, the slicer can flush the old color into the infill of your model. Since infill is hidden inside the print, the mixed colors are invisible. This can reduce purge waste by 50-90% depending on the model.
Available in: OrcaSlicer (flush into objects > infill), BambuStudio, and PrusaSlicer (wipe into object).
Purge into Support
Similarly, support structures can absorb purge material. Since supports are discarded after printing, using them as purge targets is essentially free waste reduction.
Combine both techniques for maximum savings. On models with significant infill and support, you can sometimes eliminate the purge tower entirely.
Manual Filament Swap (The Free Method)
You do not need any special hardware for multi-color printing. The filament swap at layer height technique works on any FDM printer and costs nothing.
How It Works
- In your slicer, add a filament/color change at the desired layer height (in PrusaSlicer: right-click the layer slider; in Cura: use the "Pause at Height" post-processing script; in OrcaSlicer/BambuStudio: right-click the layer bar).
- The slicer inserts an M600 (filament change) or M0/M25 (pause) G-code command at that layer.
- When the printer reaches that layer, it pauses and moves the nozzle aside.
- You manually unload the current filament, load the new color, purge by hand until the color runs clean, and resume the print.
Best For
- Simple 2-3 color designs where colors are stacked in layers (not side by side).
- Color-change models designed specifically for this technique — hugely popular on Printables and MakerWorld.
- Nameplates, signs, logos, and lithophanes with a contrasting base color.
Limitations
- You must be present at the printer for each swap.
- Colors can only change at full layer boundaries — no mixing within a single layer.
- Not practical for prints with many color changes (10+).
This is by far the best way to get started with multi-color printing. No investment, dramatic results.
Painting Colors in Your Slicer
Modern slicers allow you to paint colors directly onto your 3D model, assigning different filaments to different surface areas. This is essential for multi-color prints where colors appear side-by-side on the same layer.
PrusaSlicer / OrcaSlicer Color Painting
- Select the color painting tool (brush icon) in the left toolbar.
- Choose the filament/color you want to assign, then paint it onto the model surface.
- Adjust brush size and use the smart fill option to quickly fill flat faces.
- The triangle selector lets you paint at the mesh triangle level for precision.
BambuStudio
Same painting workflow as OrcaSlicer (which is forked from BambuStudio). You can also import multi-body STL files where each body is auto-assigned to a different filament.
Tip: for the cleanest color boundaries, paint along natural edges and creases of the model rather than across flat surfaces where the transition line will be visible.
Filament Compatibility for Multi-Color
The golden rule: stick to the same material type for all colors. Mixing different materials in a multi-color print causes adhesion failures, warping, and clogged nozzles.
| Combination | Compatible? | Notes |
|---|---|---|
| PLA + PLA (different colors) | Yes | Best combination. Easy and reliable. |
| PETG + PETG | Yes | Works well, slightly more purging needed. |
| ABS + ABS | Yes | Needs enclosed printer for warping prevention. |
| PLA + PETG | No | Different temps, poor adhesion between materials. |
| PLA + PVA | Yes | PVA for soluble supports (see below). |
| ABS + HIPS | Yes | HIPS for soluble supports in limonene. |
Even within the same material type, different brands may have slightly different temperature profiles. Test with a small color-change print first.
Tips for Successful Multi-Color Prints
Purge Settings
Fine-tune the purge/flush volume in your slicer's transition matrix. Start with defaults, then reduce gradually until you see color bleed. Going from light to dark needs less purging (50-100 mm3); dark to light needs more (150-300 mm3).
Avoiding Color Bleeding
- Increase purge volume for problematic transitions (especially dark to white).
- Add a wipe wall — a thin sacrificial perimeter printed around the purge tower to catch residual ooze.
- Lower the print temperature slightly to reduce oozing between color zones.
- Use retraction aggressively at transition points.
Transition Settings
Some slicers offer a transition length or ramming sequence setting. This controls the push-pull pattern used to shape the filament tip before unloading. The Prusa default ramming works well for most PLA; you may need to tune it for PETG or specialty filaments.
The "Filament Swap at Layer Height" Trick
No special hardware needed, and the results can be dramatic. Search for "color change" models on Printables or MakerWorld. These are specifically designed with flat color boundaries at strategic layer heights. Print the base in one color, swap to a contrasting color, and get a professional-looking two-tone result.
Combine 2-3 filament swaps with careful layer height planning to create signs, logos, and artwork that look like they came from a multi-material printer.
Multi-Color vs Multi-Material
These terms are often used interchangeably, but they mean different things:
| Approach | Purpose | Example |
|---|---|---|
| Multi-color | Aesthetics — same material, different colors | A red and white logo, a multicolor figurine |
| Multi-material | Function — different materials for different properties | TPU grips on a rigid PLA handle, PVA soluble supports |
Multi-color is straightforward: use the same filament type in different colors. Multi-material is more challenging because different materials have different printing temperatures, shrinkage rates, and adhesion properties.
Functional multi-material examples:
- TPU + PLA/PETG: Flexible grips, gaskets, or bumpers integrated into rigid parts.
- PVA + PLA: Water-soluble support material for complex geometries.
- HIPS + ABS: Limonene-soluble supports for ABS parts.
- Carbon fiber + standard PLA: Reinforcement in high-stress areas.
Multi-material printing typically requires a printer with independent temperature control and careful tuning of transition settings for each material pair.
Soluble Supports with Dual Extrusion
One of the most practical uses for multi-material printing is soluble support material. Instead of breaking away plastic supports (which always leaves marks), you dissolve them away for a perfect surface finish.
PVA + PLA
PVA (polyvinyl alcohol) dissolves in water. Print your model in PLA and your supports in PVA. After printing, submerge the part in warm water for a few hours and the supports disappear completely. Perfect for complex overhangs, internal cavities, and detailed models.
HIPS + ABS
HIPS (high-impact polystyrene) dissolves in limonene (a citrus-based solvent). Since HIPS and ABS print at similar temperatures and adhere well to each other, this is the go-to combination for soluble supports with ABS parts.
Soluble supports are the "killer app" for dual extrusion. They transform what's possible with FDM printing, enabling geometries that would otherwise require SLA/resin printing.
Cost Comparison
| System | Hardware Cost | Colors | Notes |
|---|---|---|---|
| Manual filament swap | Free | Unlimited (manual) | Requires you to be present at the printer |
| Bambu Lab AMS (single) | ~100-150 EUR | 4 | Requires Bambu Lab printer |
| Bambu Lab AMS Hub + 4x AMS | ~450-650 EUR | 16 | Maximum color capacity |
| Bambu Lab AMS Lite | ~70-100 EUR | 4 | For A1 series printers |
| Prusa MMU3 | ~300 EUR | 5 | Requires Prusa MK3.5/MK4/MK4S |
Don't forget ongoing costs: multi-color prints use extra filament for purge towers. A 4-color print can waste 50-100 g of filament in purging alone. Purge-into-infill helps, but there is always some overhead.
Popular Multi-Color Models
Looking for inspiration? These categories of multi-color models are hugely popular on Printables, MakerWorld, and Thingiverse:
- Coasters and decorative tiles: Flat designs that look great in 2-4 colors. Many are designed for the simple filament-swap method.
- Logos and signs: Company logos, room signs, and nameplates with embossed or inlaid text in a contrasting color.
- Lithophanes: Photos printed as thin panels that reveal an image when backlit. Adding a colored base frame elevates the result.
- Articulated / print-in-place toys: Dragons, octopuses, and fidget toys with multi-color segments that print assembled.
- Figurines and miniatures: Characters with pre-painted-style color zones — no post-processing needed.
- Functional prints: Tools, organizers, and mechanical parts with color-coded sections or material-specific zones.
- Topographic maps: Layered terrain maps with different colors for elevation bands.
Search for "multicolor" or "MMU" or "AMS" on model-sharing sites to find thousands of ready-to-print designs.